Source: https://datafa.st/docs/web-to-app-tracking
Markdown source: https://datafa.st/docs/web-to-app-tracking.md
Description: Track the entire user funnel from your landing page to your React Native / Expo app using DataFast identify.
# Web to app funnel tracking
Track your complete user funnel — from the moment someone visits your landing page to when they use your React Native app — all in one DataFast dashboard.
This is possible thanks to [user identification](/docs/user-identification). When you identify a user with the same `user_id` on both your website and your app, DataFast links both visitor profiles together, giving you a unified view of the entire journey.
## How it works
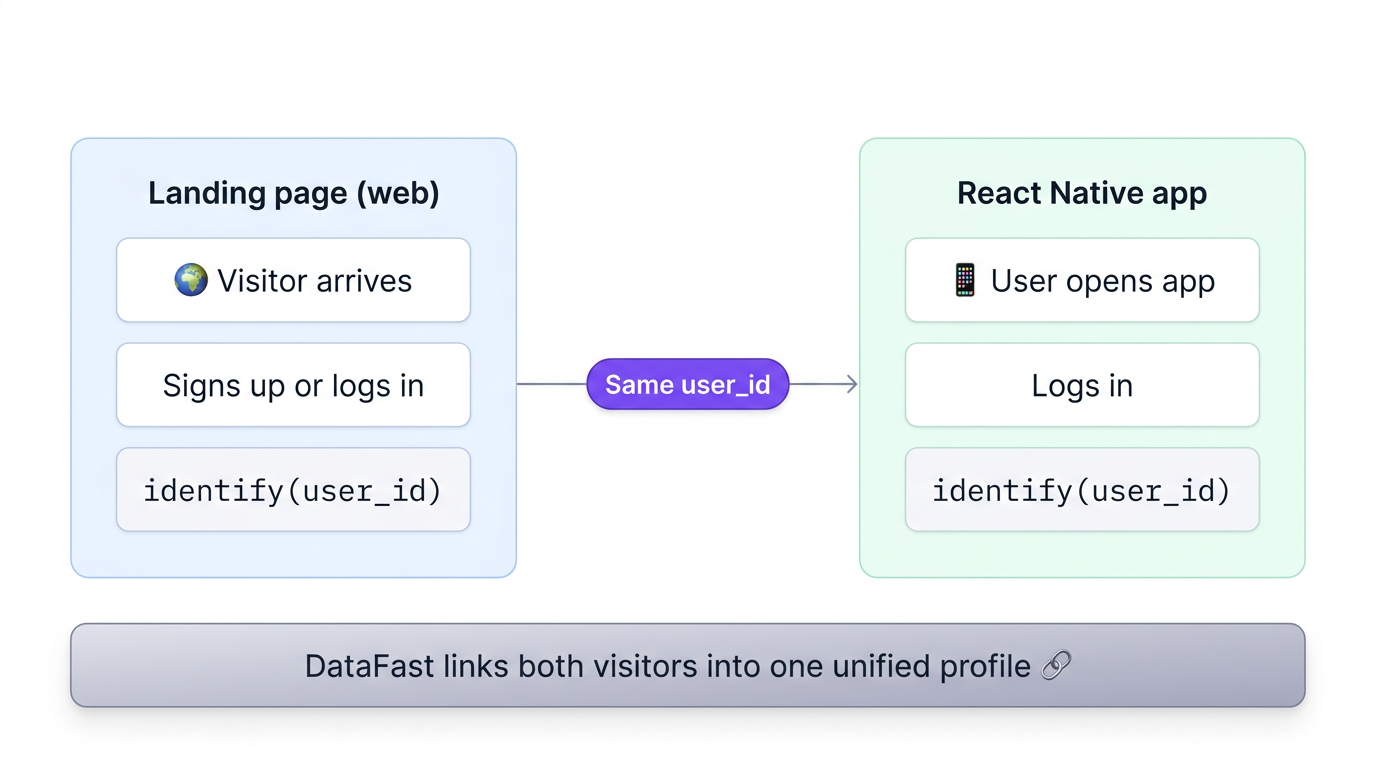
1. A visitor lands on your website — the DataFast tracking script assigns them a `visitorId` stored in a cookie
2. The visitor signs up or logs in on your website — you call `identify` with their `user_id` (e.g. email)
3. The same person opens your React Native app — the SDK assigns a new `visitorId` stored in AsyncStorage
4. They log in to the app — you call `identify` with the same `user_id`
5. DataFast detects the shared `user_id` and links both visitor profiles, creating a complete cross-platform journey
## Prerequisites
- The DataFast tracking script installed on your website ([get started](/docs/getting-started))
- The DataFast React Native SDK installed in your app ([React Native guide](https://datafa.st/docs/react-native))
- Both must use the **same DataFast website ID** (`dfid_***`)
## Step 1: Identify users on your website
When a user signs up or logs in on your website, call identify:
```javascript
// After signup or login on your website
window?.datafast("identify", {
user_id: user.email, // or any unique ID
name: user.name,
});
```
> Add the [queue snippet](/docs/user-identification) in your `` so identify calls are captured even before the main script loads.
## Step 2: Install the React Native SDK
Follow the [React Native / Expo installation guide](https://datafa.st/docs/react-native) to add DataFast to your app. Make sure to use the **same website ID** as your website:
```tsx
import { DataFastProvider } from 'datafast/react-native';
export default function RootLayout() {
return (
{/* your app */}
);
}
```
## Step 3: Identify users in your React Native app
When a user logs in to your app, call identify with the **same `user_id`** you used on the website:
```tsx
import { useDataFast } from 'datafast/react-native';
export function useIdentifyUser(user) {
const client = useDataFast();
useEffect(() => {
if (user && client) {
// Same user_id as the website — this links both profiles
client.identify(user.email, {
name: user.name,
});
}
}, [user, client]);
}
```
## Step 4: Track screens in your app
Track screen views so you can build funnels that span both web and mobile:
```tsx
import { useDataFastScreen, useDataFastTrack } from 'datafast/react-native';
export default function HomeScreen() {
useDataFastScreen('HomeScreen');
const track = useDataFastTrack();
return (
track('upgrade_click', { source: 'home' })}>
Upgrade to Pro
);
}
```
## Build a cross-platform conversion funnel
Once both your website and app are tracking events and identifying users, you can create a [conversion funnel](/docs/conversion-funnels) in your DataFast dashboard that spans both platforms. For example:
1. **Web** — Pageview on `/` (landing page)
2. **Web** — Pageview on `/pricing`
3. **Web** — Custom goal `signup`
4. **Mobile** — Screen view `HomeScreen`
5. **Mobile** — Custom goal `upgrade_click`
This gives you visibility into where users drop off between discovering your product and becoming active app users.
> Mobile screen views appear as `datafast://ios/HomeScreen` or `datafast://android/HomeScreen` in your dashboard. You can filter mobile traffic with `datafast://` in the page filter.
## Important notes
- **Same website ID:** Both your website and React Native app must use the same DataFast website ID. This ensures all data goes to one dashboard.
- **Same user_id:** The `user_id` you pass to identify must be identical on both platforms. We recommend using the user's email.
- **Identify on every session:** Call identify each time the user starts a new session (e.g. on app open if the user is already logged in) to maintain the link.
- **Domain configuration:** In your DataFast website settings, make sure your app's domain is listed in the allowed hostnames.
- **Offline support:** The React Native SDK queues events offline and sends them when connectivity is restored, so you won't lose data.